Canon Printer MG3650 WiFi Setup [A Comprehensive Guide]
Are you looking for a Canon Printer MG3650 WiFi setup guide? Well, you have landed on the right page. This guide will help you to set up your Canon MG3650 to WiFi.
Some access points (usually named wireless routers) have an automatic connection button - "WPS," which is for WiFi Protected Setup and allows devices to connect to a network without the need to type a password. It is the easiest method to connect your Canon MG3650 printer, so if the access point has a WPS button, select 'WPS Connection Method' below are the guidelines for using this WPS button method.
Select 'Standard Connection Method' below if your access point doesn't support the 'WPS Connection Method.' Without further ado, let's get started.
Steps To Use WPS Connection Method
Before we begin, below are some requirements that must be completed to use the WPS push button:
● Your access point must have a physical WPS push button; please refer to your device's user guide for details.
● The internet network must use WiFi Protected Access (WPA) or WPA2 security protocols. If the Wired Equivalent Privacy (WEP) security method is used, or if no security is allowed, most WPS-allowed access points would not connect using the WPS button method. You can check the wireless connection settings on your PC for security details.
In order to use WPS Connection Method for the Canon mg3650 printer WiFi setup, kindly follow the steps below to complete the setup:
- First, ensure your printer is on and that the WPS button on the wireless router can be pressed if needed.
- Next, click and hold the WiFi button (A) on your printer until the ON lamp (B) flashes.
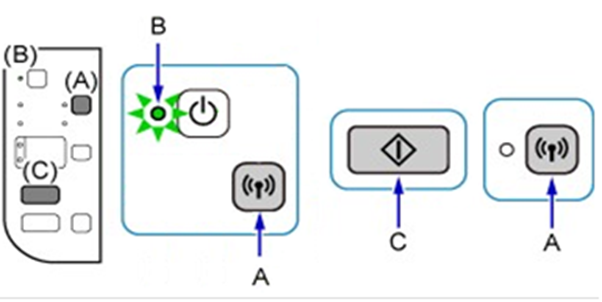
- Then, click on the Black button (C) and the WiFi button (A); ensure the WiFi lamp (D) flashes quickly and that the ON lamp is flashed. Now, go to an access point and click the WPS button within two minutes.
- The blue color WiFi lamp on your printer will remain lit while searching, and both the Power and WiFi lamps will flash when connected to an access point. When your printer successfully connects to a wireless network, the WiFi lamps and Power will stop flashing and continue to light up.
- After that, ensure the WiFi lamp and ON lamp are flashed.

Refer to an access point manual for precise details on how to press the WPS push button.
Verify Network Settings
To verify that your Canon printer is successfully connected to a wireless network, print out your printer's network settings:
- First of all, ensure your Canon printer is on.
- Next, load two A4 sheets or letter-sized paper.
- Then, click and hold the WiFi button until the Power lamp flashes, and release it.
- Now, click the WiFi button, and the network information page will be printed.
This ends the WPS Connection Method process.
Steps To Use Standard Connection Method For Windows
If an access point doesn't support the WPS button method, use the following steps for Canon Printer MG3650 WiFi Setup on your wireless network.
- First, when the Startup screen appears, tap on Start Setup.
- The software will scan to see any updates to the printer driver and download them as needed; it takes a few minutes.
- Next, select your country and region, and tap on Next.
- If you accept the License Agreement, tap on Yes.
- After that, tap on Agree if you wish to participate in the Extended Survey Program; otherwise, tap on Don't Agree.
- Then, tap on Next in order to allow All Install Wizard Processes.
- Now, select the Wireless LAN Connection option, then tap on Next.
- Next, select Connect via wireless and tap on Next.
- Ensure your printer is on, and tap on Next.
- The software will search for printers already set up on the network. Detection will take time, so please have patience when searching for the software's printer.
- If you've already connected your Canon printer to the network, select from the "Printers on network list" window and tap Next to start the installation process, then move to step 17. If it's your first time setting up your Canon printer, it will not be shown in the list, so continue to step.
- Select "Setting printer could not be found on the list" and tap on Next.
- The screen will appear shortly (as shown in the picture below.)

- The Setup Guide window will open and guide you via connecting your Canon printer to the network using the "Connection via Cableless Setup" procedure. Follow your on-screen steps to prepare your printer connection. Tap on Next only when your printer matches the example shown below.
- Now, wait until setup detects your printer. The network connection on your PC is temporarily disabled during this time.
- After the setup is done, tap on Next.
- Mp3 drivers and network tools will be installed; wait while the software is installed.
- Now, wait for the setup to complete.
- If installing your printer for the first time, Print Head Alignment is suggested; after completing the installation, tap on Next.
- To do a test print to confirm the installation, tap on Execution; otherwise, tap on Next.
- Now the setup is complete, tap on Next to complete the software installation.
- Now, choose the software you want to install and tap on Next. If you're unsure what software you want to install, don't worry; you can always uninstall it later if you want.
- Tap on Next to register your printer. Otherwise, tap on Skip.
- Lastly, tap on Exit to complete the installation.
Steps To Use Standard Connection Method For Mac
If an access point doesn't support the WPS button method, use the following steps for the Canon Printer MG3650 WiFi Setup on your wireless network.
- First, double-tap on the downloaded .dmg file to open the screen (as shown in the picture below.) Double-tap the Setup sign, and tap on Open to start setup.
- When the screen appears, tap on Next.
- When the screen appears (as shown in the picture below), enter your password to allow the helper tool to be installed, and tap on Install Helper.
- When the screen appears, tap on Start Setup.
- The software will scan to see any updates to the printer driver and download them as needed; it will take a few minutes.
- Now, select your country & region, and press Next.
- If you accept the License Agreement, tap Yes.
- Then, press Agree if you want to participate in the Extended Survey Program; otherwise, tap on Do not Agree.
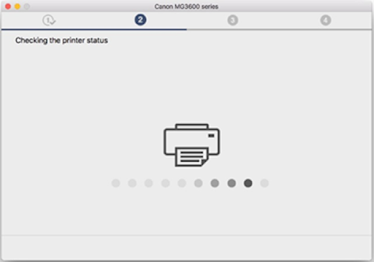
- The following screen will appear while checking the status of your printer; it will take a few minutes.
- After that, choose the Wireless LAN Connection option, and press Next.
- Make sure your printer is on and press Next.
- The software will search for printers already set up on the network. Detection will take time, so please have patience when searching for the software's printer.
- If you've already connected your Canon printer to the network, select from the "Printers on network list" window screen, press Next to start the installation, and move to step 20. If it's your first time setting up your Canon printer, it will not be shown in the list, so continue to step 14.
- Select "Setting printer could not be found on the list" and press Next.
- The screen will appear shortly (as shown in the picture below.)
- The Setup Guide screen will open and guide you via connecting your Canon printer to the network using the "Connection via Cableless Setup" procedure. Follow your on-screen steps to prepare your printer connection—press Next when your printer matches the example displayed below.
- Wait until setup detects your printer. Your network on your PC is temporarily disabled during this time.
- Tap on Allow when the following message is shown.
- After the Setup is done, press Next.
- Mp3 drivers and network tools will be installed; wait while the software is installed.
- Wait for the setup to finish.
- Now, tap on Add Printer.
- Your printer will be searched for and shown in the "Add" window below. Only the Bonjour multifunction will be explored. Wait for a few minutes until your window screen is updated.
- Wait until Canon IJ Network is discovered, and select your printer with "Canon IJ Network" mentioned in the "Kind" column, then press Add.
- The following screen appears; wait until your printer is set up. After adding your Canon printer, the web browser may hide the setup screen. If it does, tap the "Setup" sign in the dock to make the screen appear again.
- Tap on Next to finish your printer setup.
- If installing your printer for the first time, Print Head Alignment is suggested; after completing the installation, press Next.
- To do a test print to verify the installation, press Start; otherwise, press Next.
- The setup is done; press Next to complete the installation process.
- Select the software you want to install and press Next. If you are unsure what software you want to install - don't worry; you can uninstall it later.
- Press Next to register your Canon printer. Otherwise, you can tap Skip.
- Finally, tap Exit to complete the installation process.
So, these are the detailed step-by-step instructions for Canon Printer MG3650 WiFi Setup using WPS Connection Method and Standard Connection Method on Windows and Mac.
Read More :- Ij.start.canon set up

Comments
Post a Comment